SUPPLIES
- Scissors - Keep a pair handy, because more than likely you will have a piece to break while you’re crocheting and you’ll need it for finishing off.
- Large Crochet Hook – I found an 15mm ergonomic hook at Hobby Lobby labeled as a P-Q. Because it did begin to hurt my hands – and actually left cuts on my pinky, I later covered it with a technique I found online using the rainbow loom bands. It’s enabled me to work on these a lot longer at one time.
- Two newspaper sleeves full of scraps. (You can use whatever you want for your scraps as long as they’re contained. It will prevent the little bits from making their way out of the little holes in the stitching.)
- About 8oz of balled plarn in the color(s) of your choice.
Consider the feel of the bags when selecting which you want to use for the pillow. I tend to use mostly WalMart because they’re softer, and all white with just a little blue. It takes me a little less than 8oz of bags for each of these, plus two newspaper sleeves stuffed full of scraps (make sure you knot those closed) and the same 15mm hook.
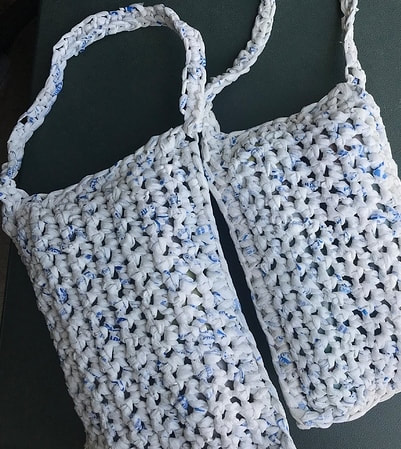
I’ve changed the size on this since I started mainly to make them lighter for carrying and there wasn’t really a guideline for them since I wasn’t finding a lot in searches for them. I just tweaked until I got the pattern I wanted. This could also be modified to knit, if you prefer. Obviously the ones in the photo include a larger and a smaller. I believe that I’ve actually even gone smaller since that photo was taken.
TIP: If a piece does break while you’re crocheting, and it will happen at some point, cut it off as close to the knots as you can and pull off the knots. Stuff all of those into the newspaper sleeve (or whatever you choose to use).
You are going to use the pieces as though they’re one large thick piece of yarn, so hold strands together. It will seem weird at first but it eventually starts to feel normal. Chain until you reach a length of ten and a half inches. Turn and SC back. All you’re going to do here is make a rectangle of standard single crochet stitches until you reach a final measurement piece of 10” x 30.”
Fold your piece so that it will be roughly 15” x 10” – the measurement police aren’t going to come and confirm this. Just as long as it’s large enough for someone’s head to sleep on, they’re grateful. Start at one corner and work your way down the side (towards the folded end – leave your opening for now) and just SC (single crochet) through both layers creating an exposed seam, continue across the folded end (even though it’s already closed, it makes for a better look), and follow up the other side back to your open end.
At this point, I tend to chain enough to make my handle (24”) and attach it to the other side with a single crochet, then single crochet back across to the other side. Then start the closing of the top. Here is where the scraps come in that I mentioned before. Stuff your first bag in and under where you just closed up and then follow with your second bag. You may want to place them in with the knotted end down so they don’t get caught up in your closing of the top. Continue single crocheting until you reach the end. Cut off your plarn with about two inches or so. I tend to weave it through several of the holes and making sure that each end comes out different neighboring holes and then tie those ends together in various spots.
 RSS Feed
