SUPPLIES
PLARN
Completely basic instructions for creating plarn and tips for storage. (Instructions for Crocheted items will be in separate posts so they won't take forever to load and be so pic heavy even though there are places I have to mention those processes here.)
- Scissors - I do use a pair of scissors dedicated to just this because I’ve found it works better, but that could be just a quirk. Some prefer a rotary cutter.
- Plastic grocery/shopping bags (even if they have holes, you may be able to work around those)
PLARN
Completely basic instructions for creating plarn and tips for storage. (Instructions for Crocheted items will be in separate posts so they won't take forever to load and be so pic heavy even though there are places I have to mention those processes here.)
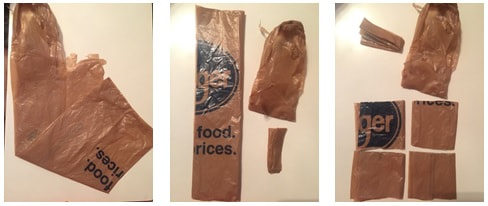
Straighten out each of your bags pulling at each side of the bottom so they will flatten. Fold the bag so that the handles and bottoms meet each other and smooth it out. Then fold that same direction again and smooth out again. Cut off your bottom seam and the handles so that both top and bottom are straight.
Now fold your bag so the top and bottom meet and cut it at the halfway point. Then do the same one more time. You should now have four squares that will open up to connected loops. If your loops aren’t connected, toss them aside.
A lot of people throw away the handles, bottoms and any unconnected loops but I have something to do with those if you’re interested in the pillows. I keep a newspaper sleeve nearby and just stuff them in it. Will explain that further later.
Now, if you want to store the bags to work with later, continue with the process above. After you experience cutting for a while and you want to make up balls of plarn immediately after cutting, consider this. Straighten out about five of the bags (or whatever you think your cutting tool can handle), then fold in the original manner and cut the same way. Saves some time but the other method will save space if you don’t want to work on them right away.
If you are going to stash them away for another day, grab some zipper storage bags and place them in these until later. I end up weighing my bags and placing a piece of paper inside with the weight (in ounces) so I will know what I have. Once I get 3lbs of brown bags, I know I have enough for a full-size mat (I’m a Virgo, I just can’t mix the colors.) The pillows take somewhere around 8oz, but I tend to just ball up the white plarn right away anyway so I can use up all of the stuffing.
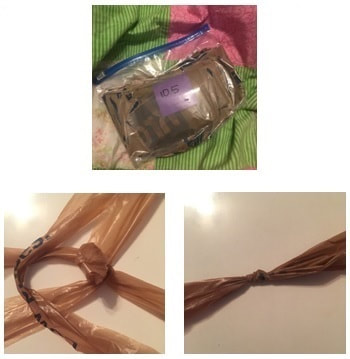
When you first start putting the plarn together it may be easier to place it on the table as in the photo. One loop covering the other. Pull the bottom of the top loop under and through the middle of those two loops and pull tight. (The loop sticking up is the bottom of the piece that is layered over). You are going to pull that center piece to the right (basically back to where it came from) and pull carefully but pull it tight til you get a knot. Some will break. Just use those in your pillow stash.
Repeat with the next piece. You may want to pull the previous loop tight and hold the point of it so you don’t end up with uneven pieces. That may not make sense until it happens to you. Just continue with that process.
Keep them a reasonable size. If you run out, just take out another ball. Holding up your working tail, at the point, tuck the first strand of your new ball through the loop. Place the ball itself through the middle of that piece as if you’re doing a regular set. Then proceed as usual.
 RSS Feed
